EFS + Lambda + EC2 a simple Intro
On the 18th of June 2020 AWS released EFS for Lambda. This is a pretty great release that provides serverless architectures a way to implement common tasks such as large libraries ( Lambda is limited to 50mb per function zipped deployment package, though you can leverage layers to expand this ), access to files your other servers may have access to e.g. assets from existing applications or the ability to drop assets for consumption of exisitng services. In this quick walk through we will look at how to create your first Elastic File System, how to mount it in EC2 and how to mount it in Lambda.
This diagram provides an overview:

The first thing we will do is define Security Groups:
- Your home computer/laptop ssh to ec2
Navigate in the console to:
https://ap-southeast-2.console.aws.amazon.com/ec2/v2/home?region=ap-southeast-2#SecurityGroups:
Click “Create Security Group” and fill in the details as so:
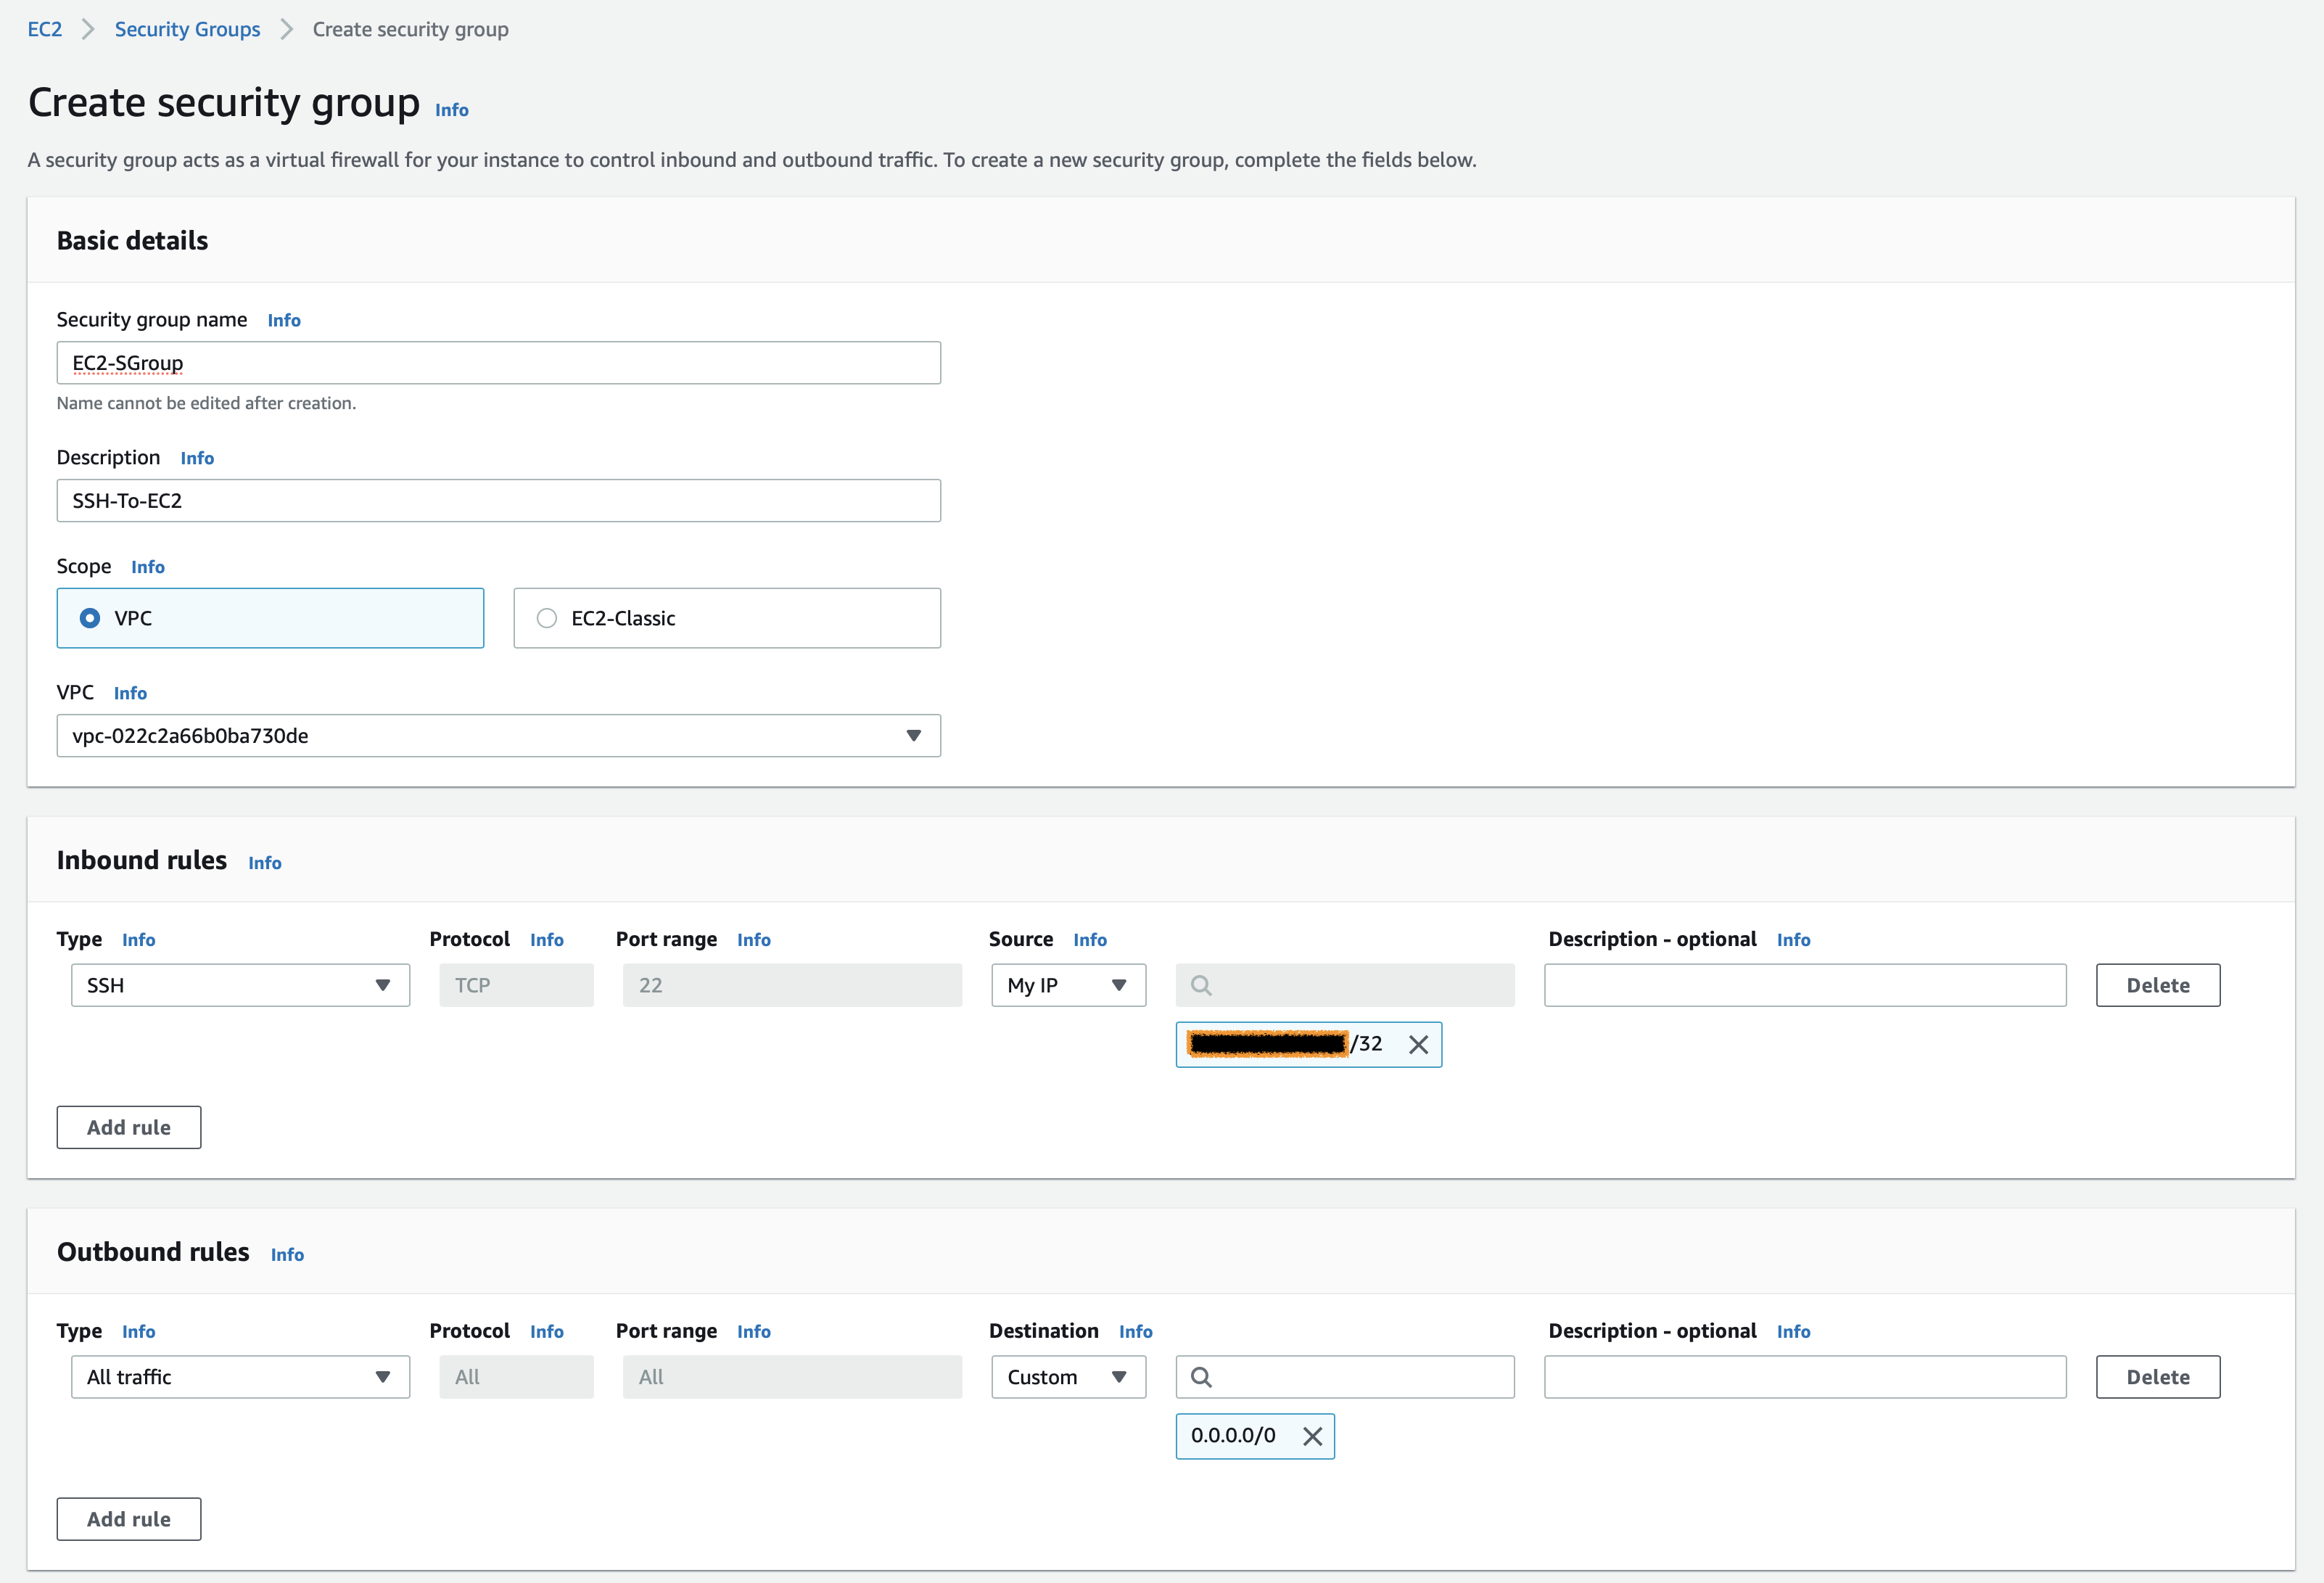
Next, we will spin up an EC2 instance and ssh to the machine.
Navigate to:
https://ap-southeast-2.console.aws.amazon.com/ec2/v2/home?region=ap-southeast-2#LaunchInstanceWizard:
Choose Amazon Linux 2 AMI, 64bits (x86), click “Select”. On the next screen select “t2.micro” then click “Configure instance details”, ensure “Auto-assign Public IP” is set to enable as we want to ssh it directly to this machine.
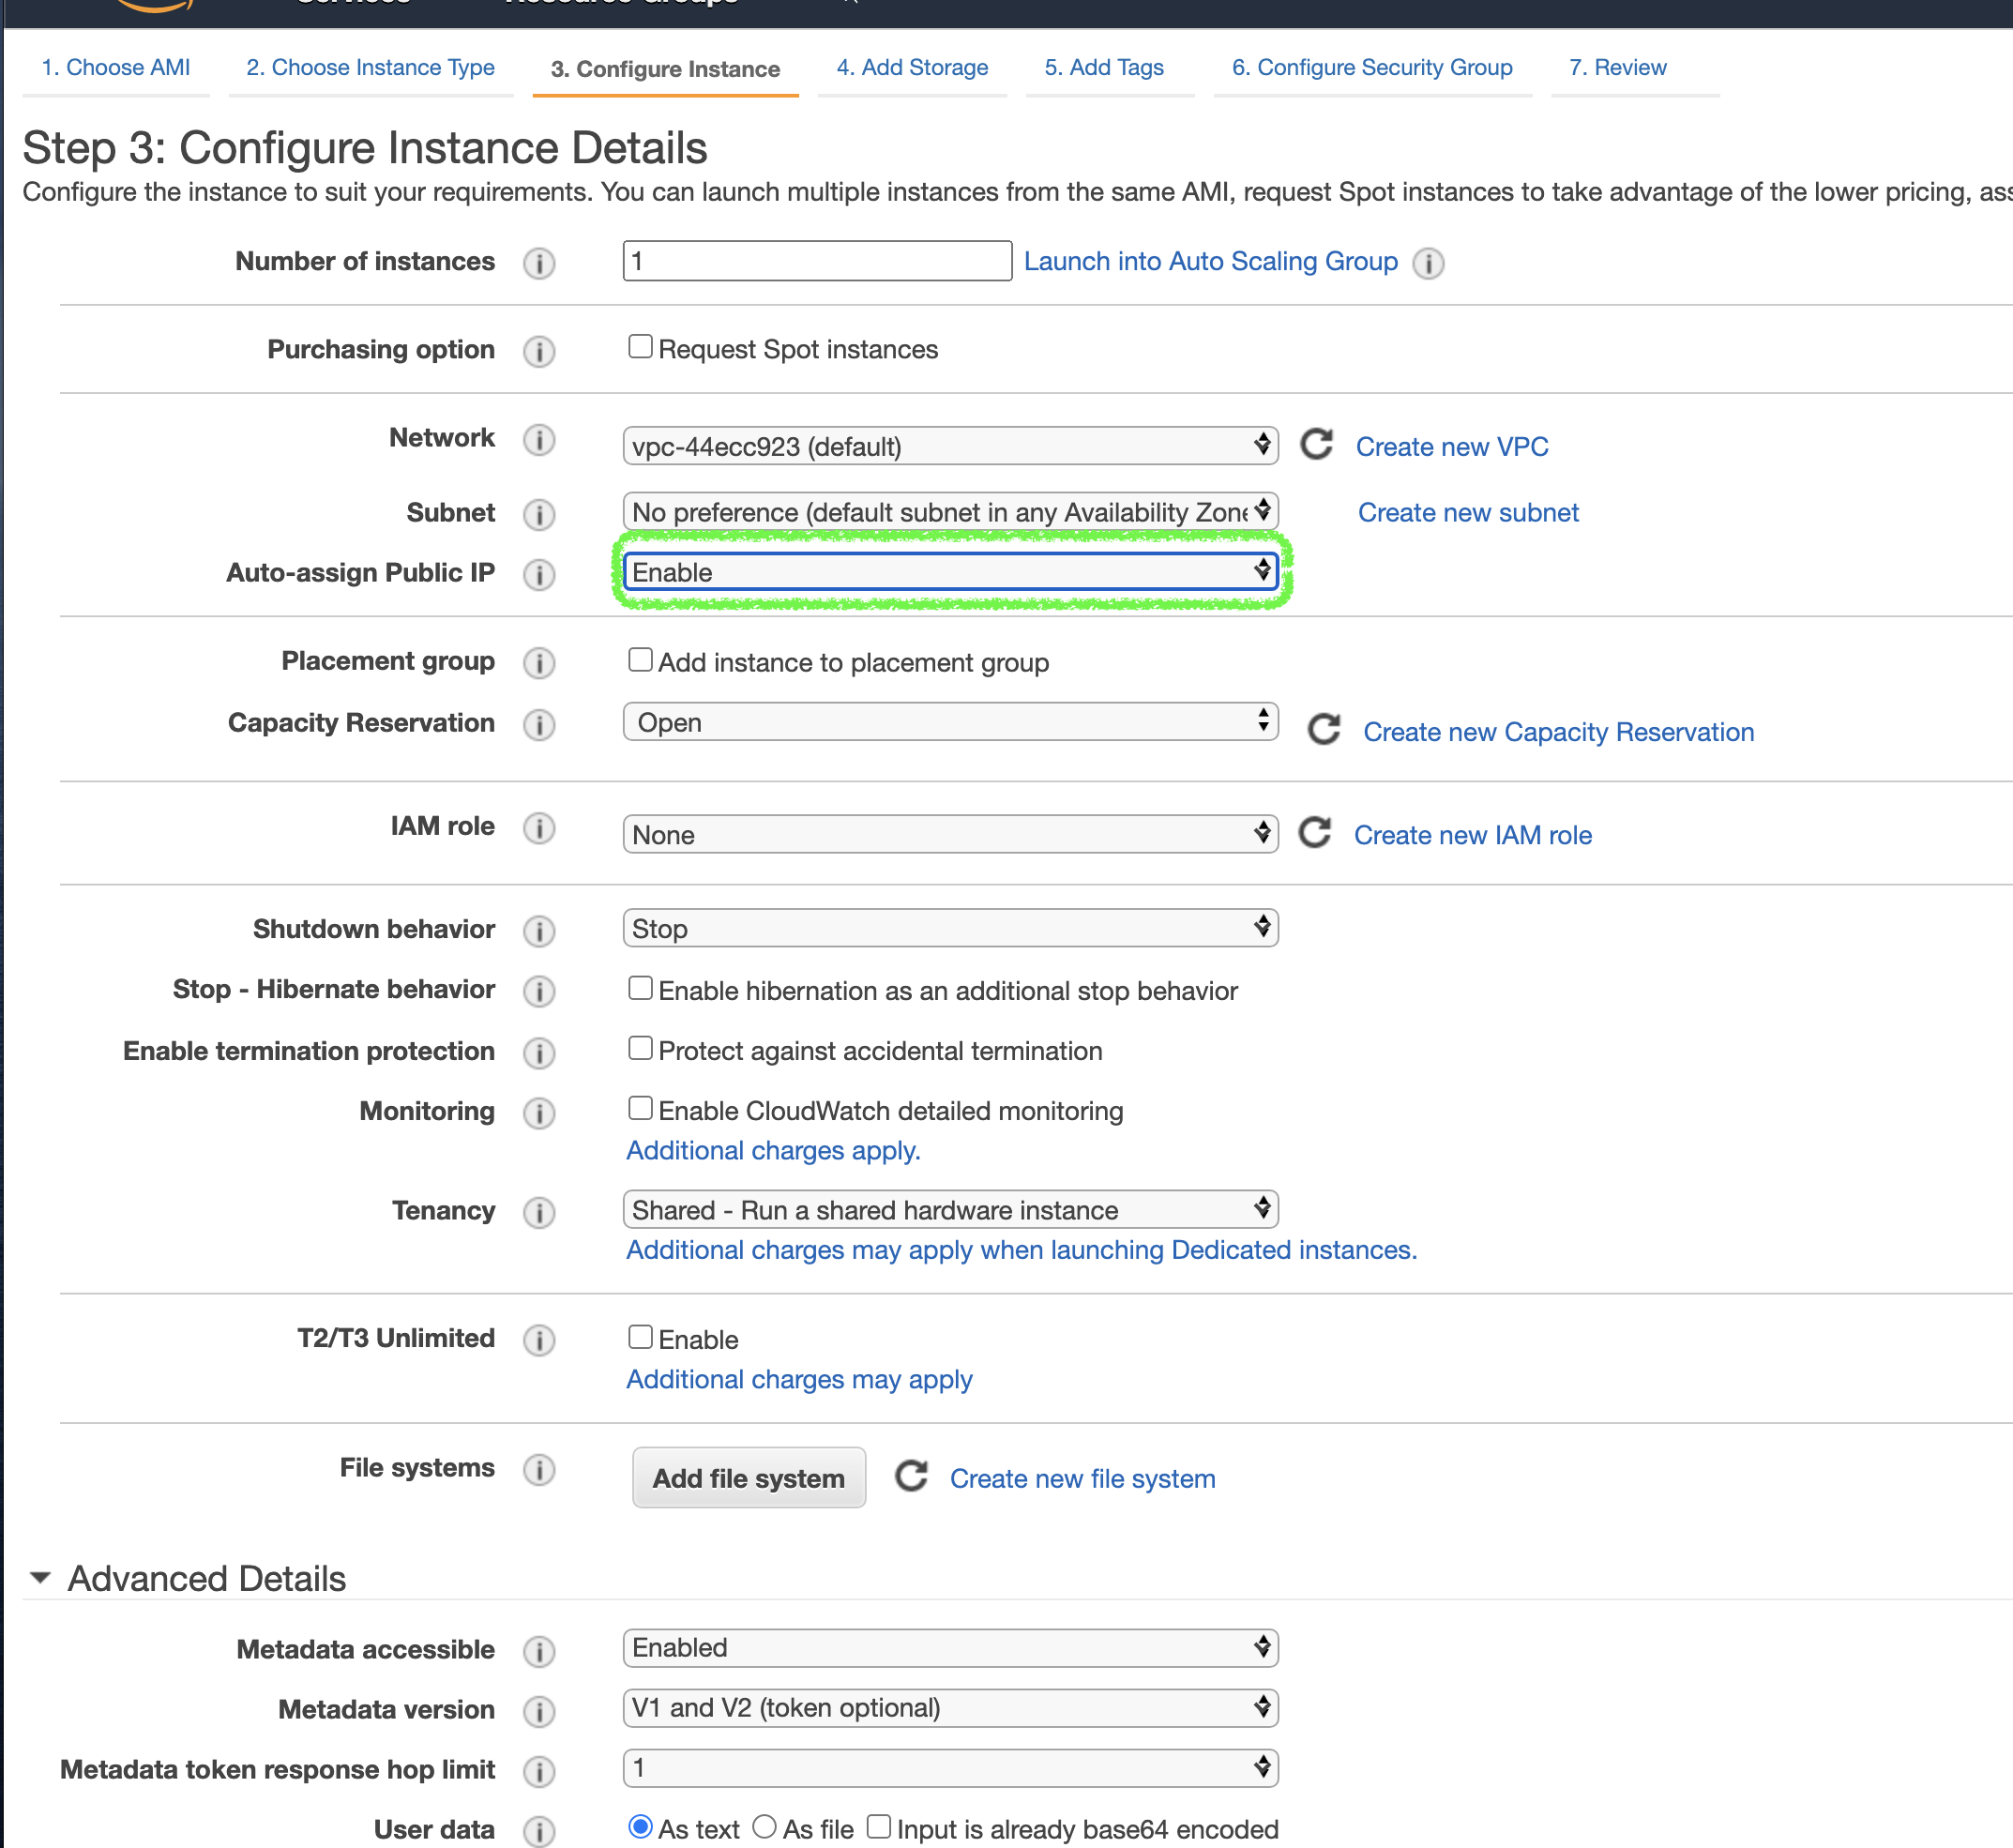
Click “Next” Add storage”, Click “Next: Add tags”, Click “Next: Configure Security Group”. We want to use the security group we created, click “Select an existing security group.” Select the security group we just created.
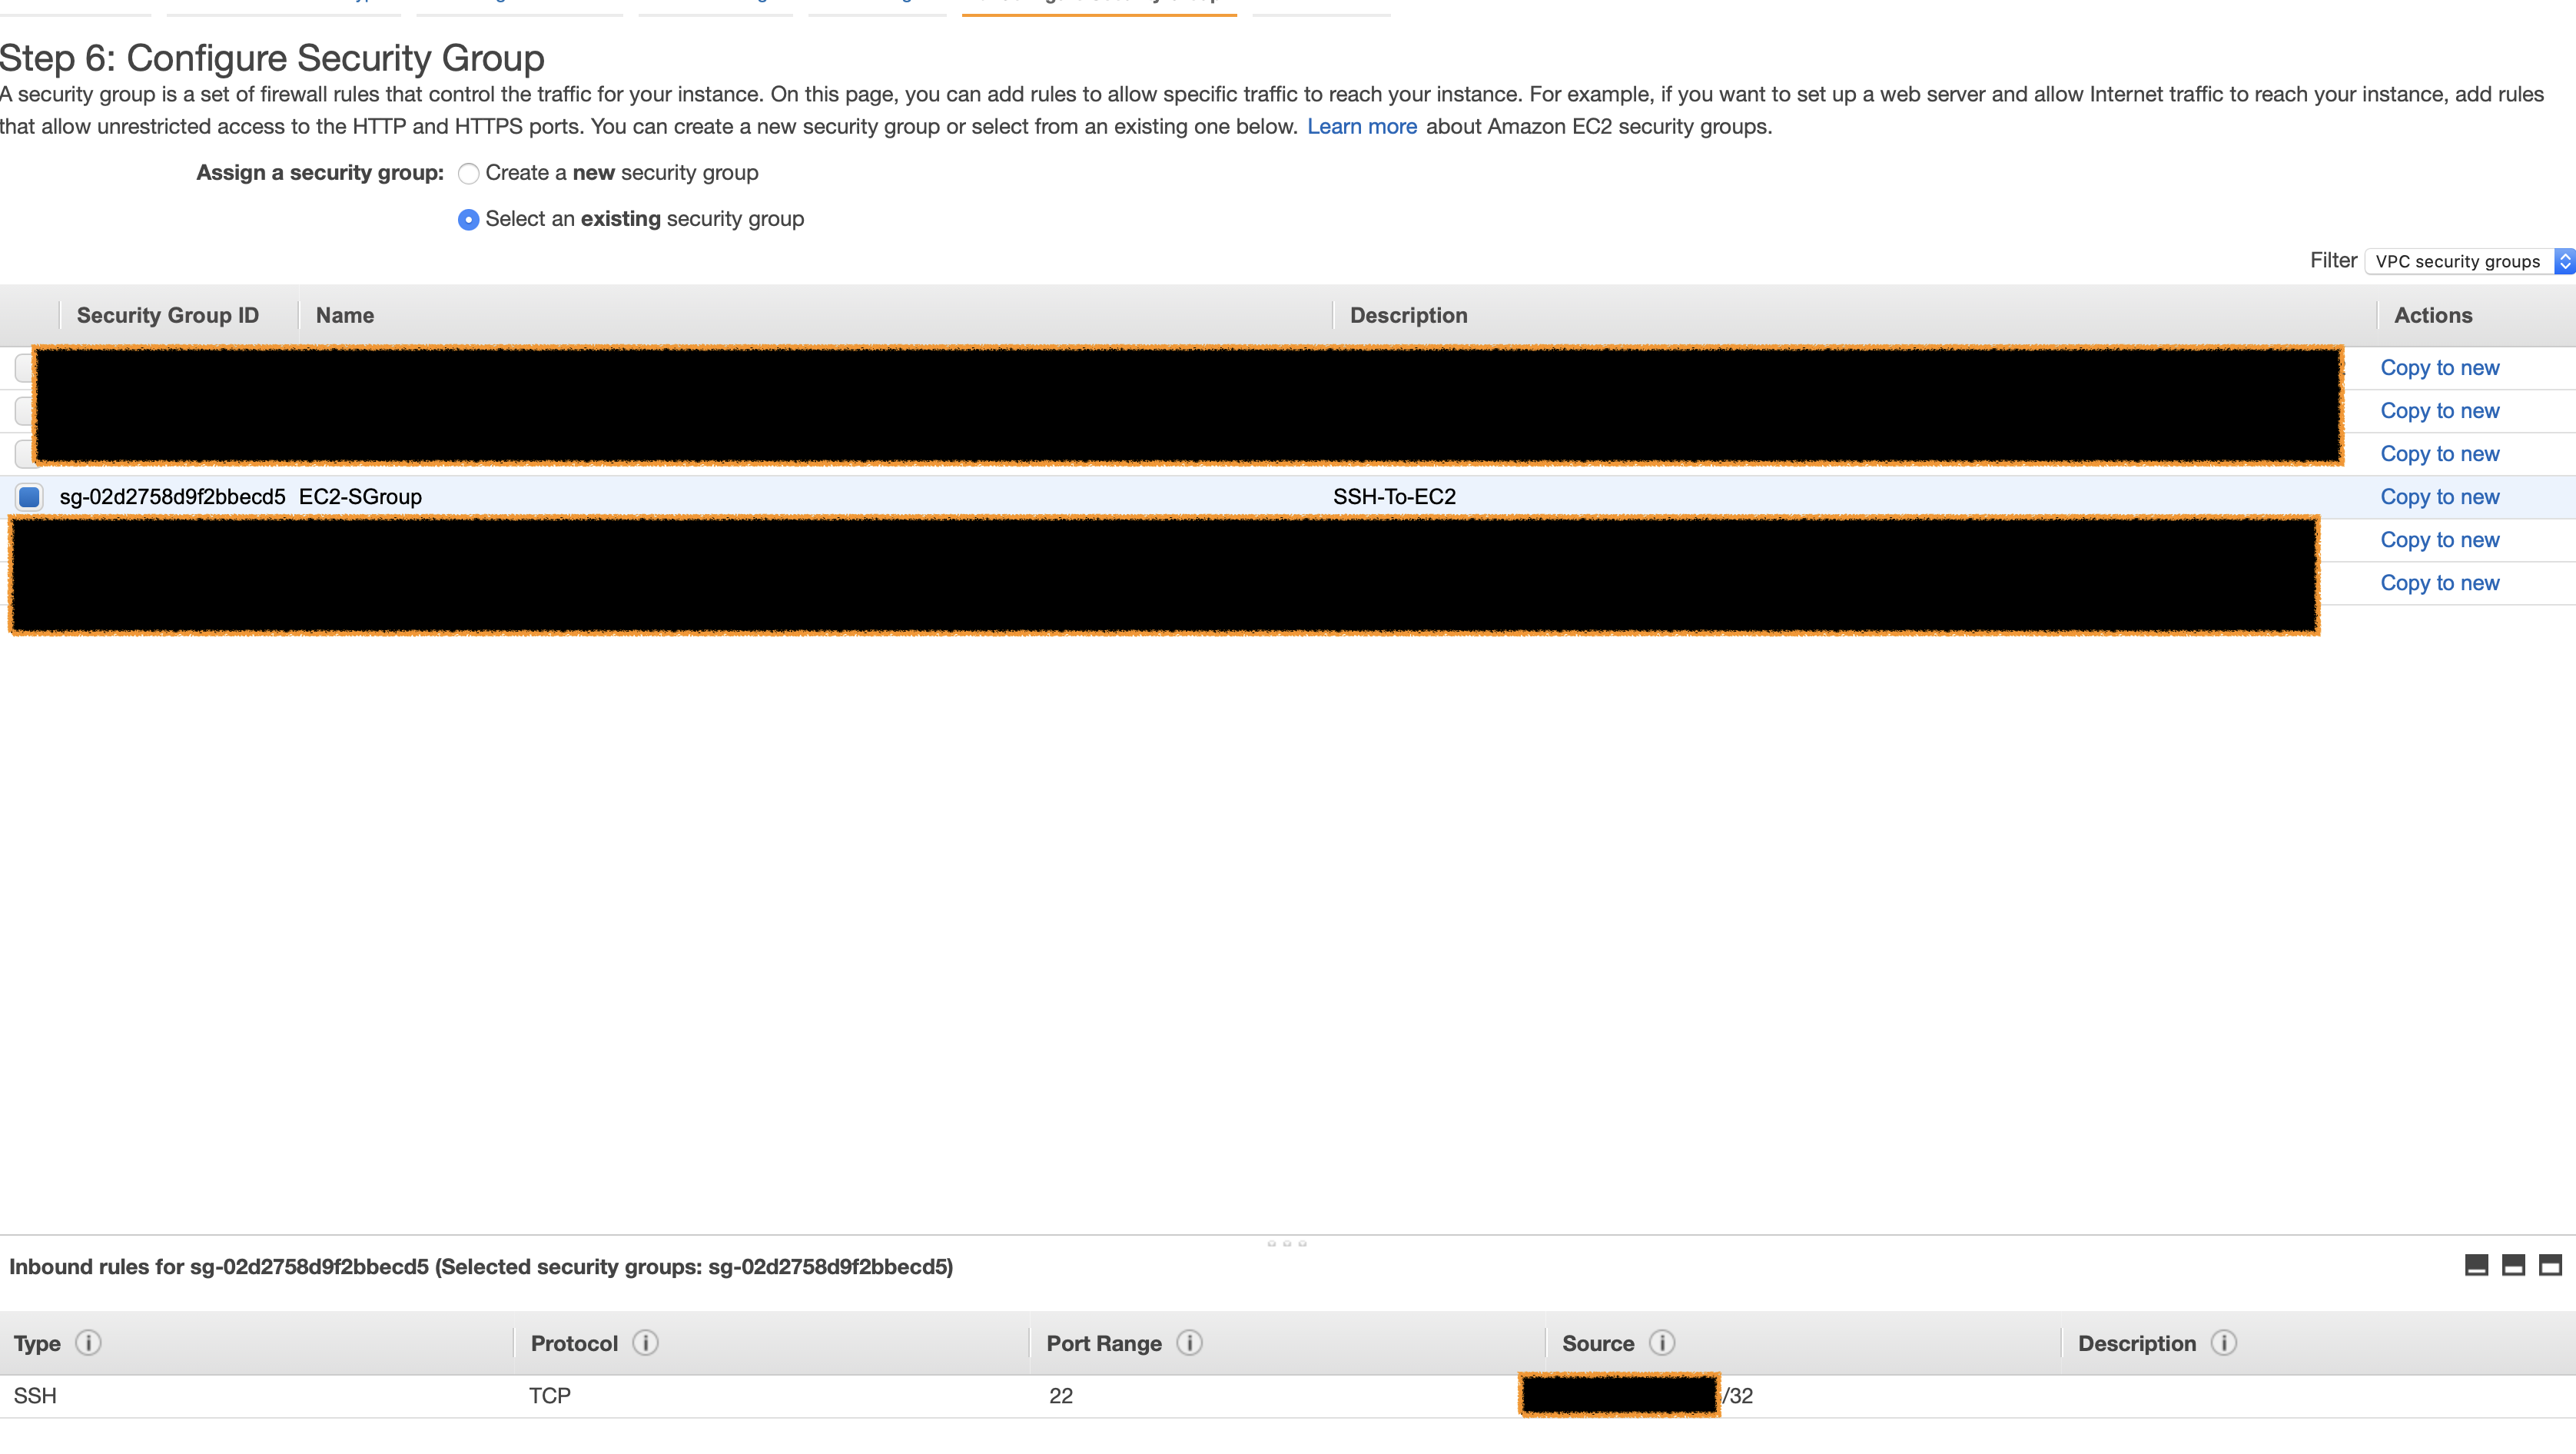
Click “Review and Launch”, then click “Launch”, make sure you select an existing key pair or create a new one.
We will ssh to the machine to test:
chmod 400 ~/pathto/sshkey.pem

ssh -i ~/pathto/sshkey.pem ec2-user@ipaddress
You can find the IP address by viewing the information panel at:
https://ap-southeast-2.console.aws.amazon.com/ec2/v2/home?region=ap-southeast-2#Instances:sort=instanceId
Once you can ssh to the EC2 instance we are ready to create the Elastic File System.
Now that we have a security group and EC2 instance, we want to allow the EC2 instance to connect to EFS, we will create a security group for this purpose.
Again navigate to:
https://ap-southeast-2.console.aws.amazon.com/ec2/v2/home?region=ap-southeast-2#SecurityGroups:
Click “Create Security Group” and fill in the details as so. The source is the security group we created for access to the EC2 instance, so type “EC2-SGroup” and select that item.
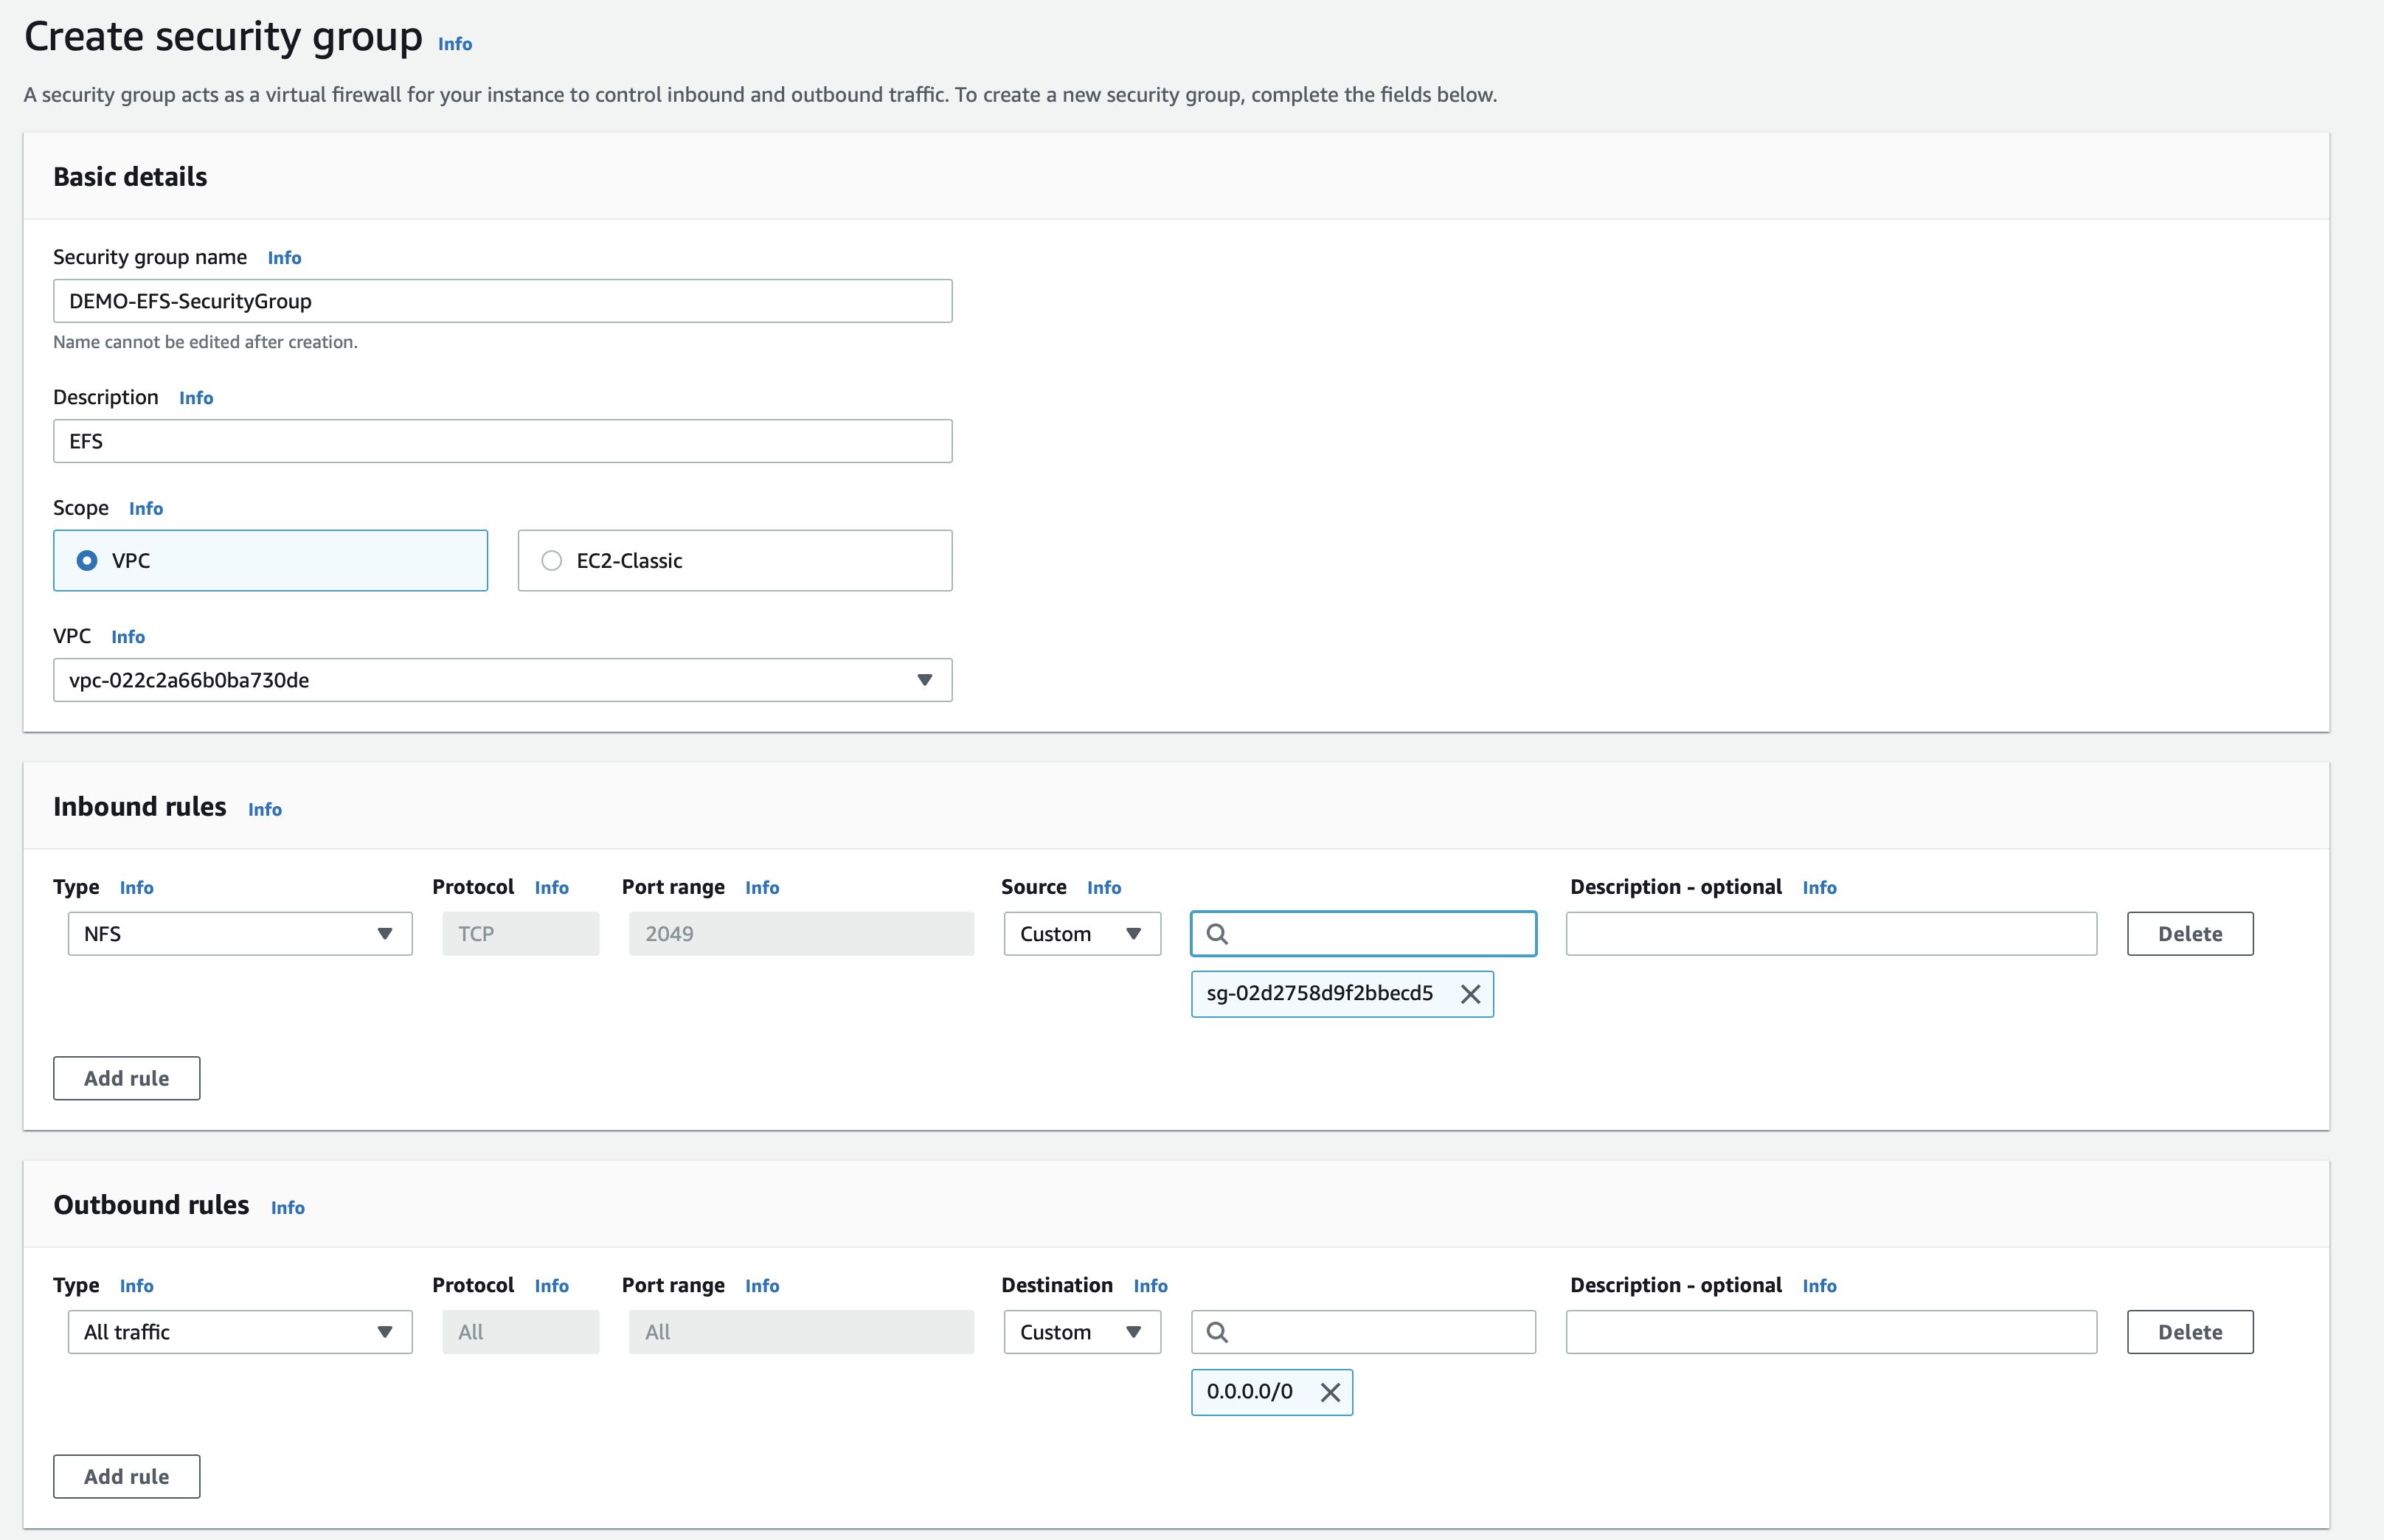
Navigate to:
https://ap-southeast-1.console.aws.amazon.com/efs/home?region=ap-southeast-1#/filesystems
And click “Create File System” fill out the details as so and click “Next Step”, ensure you use the EFS security group we created, this will allow resources to access the EFS. Click “Next Step”
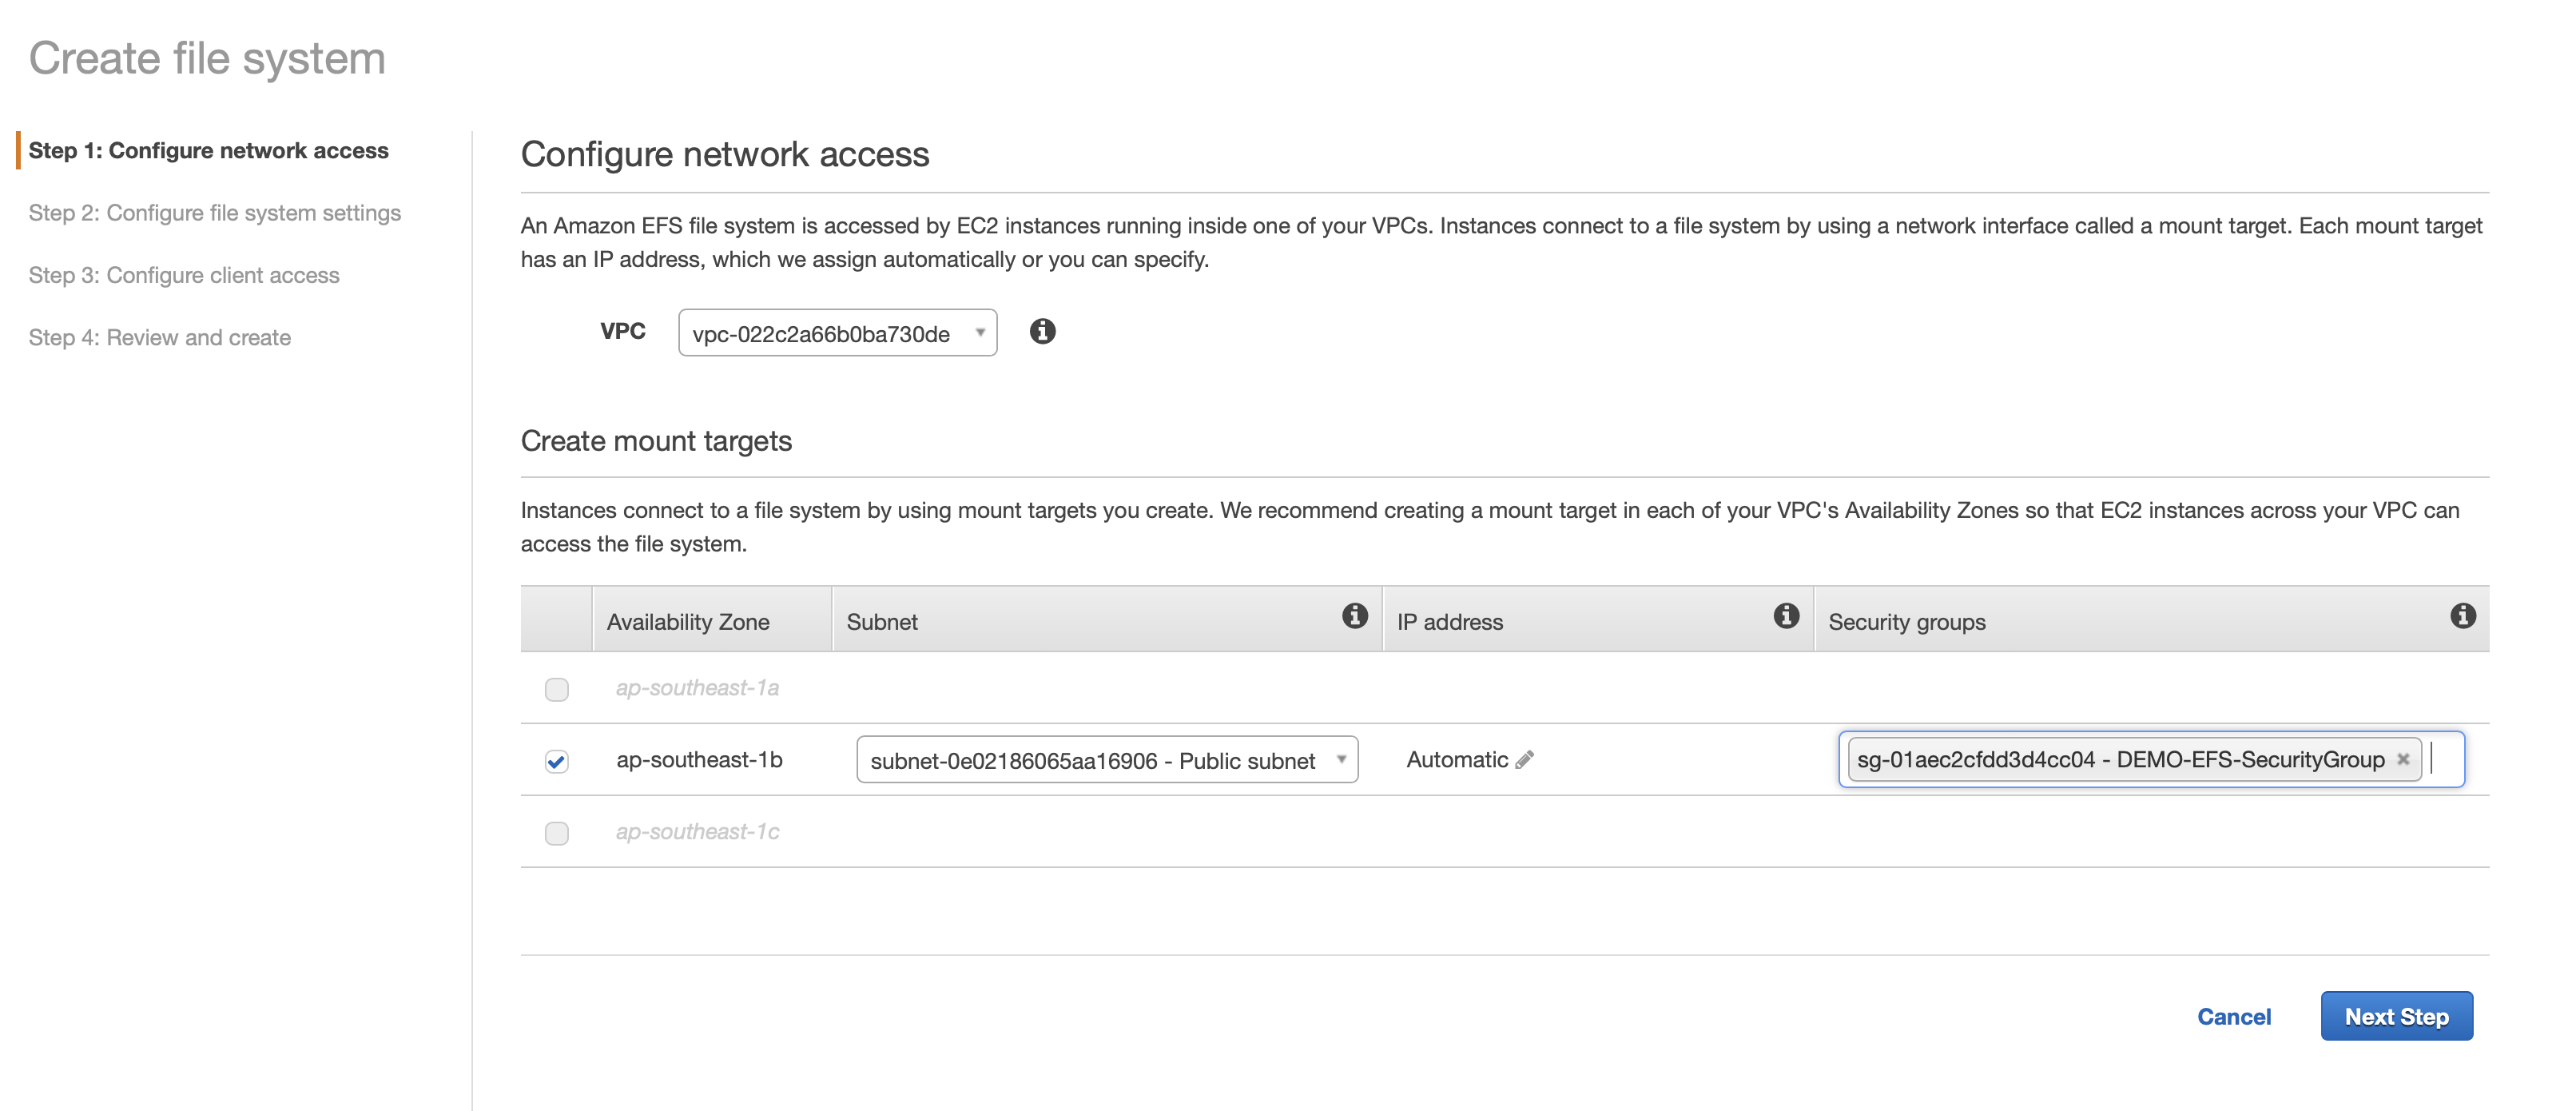
Leave the defaults as so and click “Next”

We will now configure a client access point, I’ll go into more detail later but this will effectively segregate the folder and provide full read/write access for resources that connect. Fill out as follows:

Click “Next” then “Create”.
We are now ready to mount the EFS. Return back to the Terminal that is ssh’d to the EC2 and run:
sudo yum install -y amazon-efs-utils
mkdir myefs
sudo mount -t efs -o tls,accesspoint={accessPointId} {filesystemId} myefs/
The EFS share should now be mounted to confirm:
cd myefs
ls -la
echo "Hello World!" >> some_file.txt
dd if=/dev/zero of=500MegFile.bin bs=500M count=1 oflag=direct
ls -la
It should look something like:

At this point we have successfully mounted an EFS file system and written a few files to it. The dd command will write a large file, 500meg in this example. This allows you to look at performance as well as just test writing a large file.
We are now ready to create a Lambda function and mount EFS. We will need to place the Lambda into a VPC that will require some extra permissions. Navigate to IAM and create a policy like so:

{
    "Version": "2012-10-17",
    "Statement": [
        {
            "Effect": "Allow",
            "Action": [
                "ec2:DescribeNetworkInterfaces",
                "ec2:CreateNetworkInterface",
                "ec2:DeleteNetworkInterface",
                "ec2:DescribeInstances",
                "ec2:AttachNetworkInterface"
            ],
            "Resource": "*"
        }
    ]
}
Navigate in the console to Lambda and select “Create new Function”, name the Lambda function then select “Use default bootstrap” and “Create a new role with basic Lambda permissions”
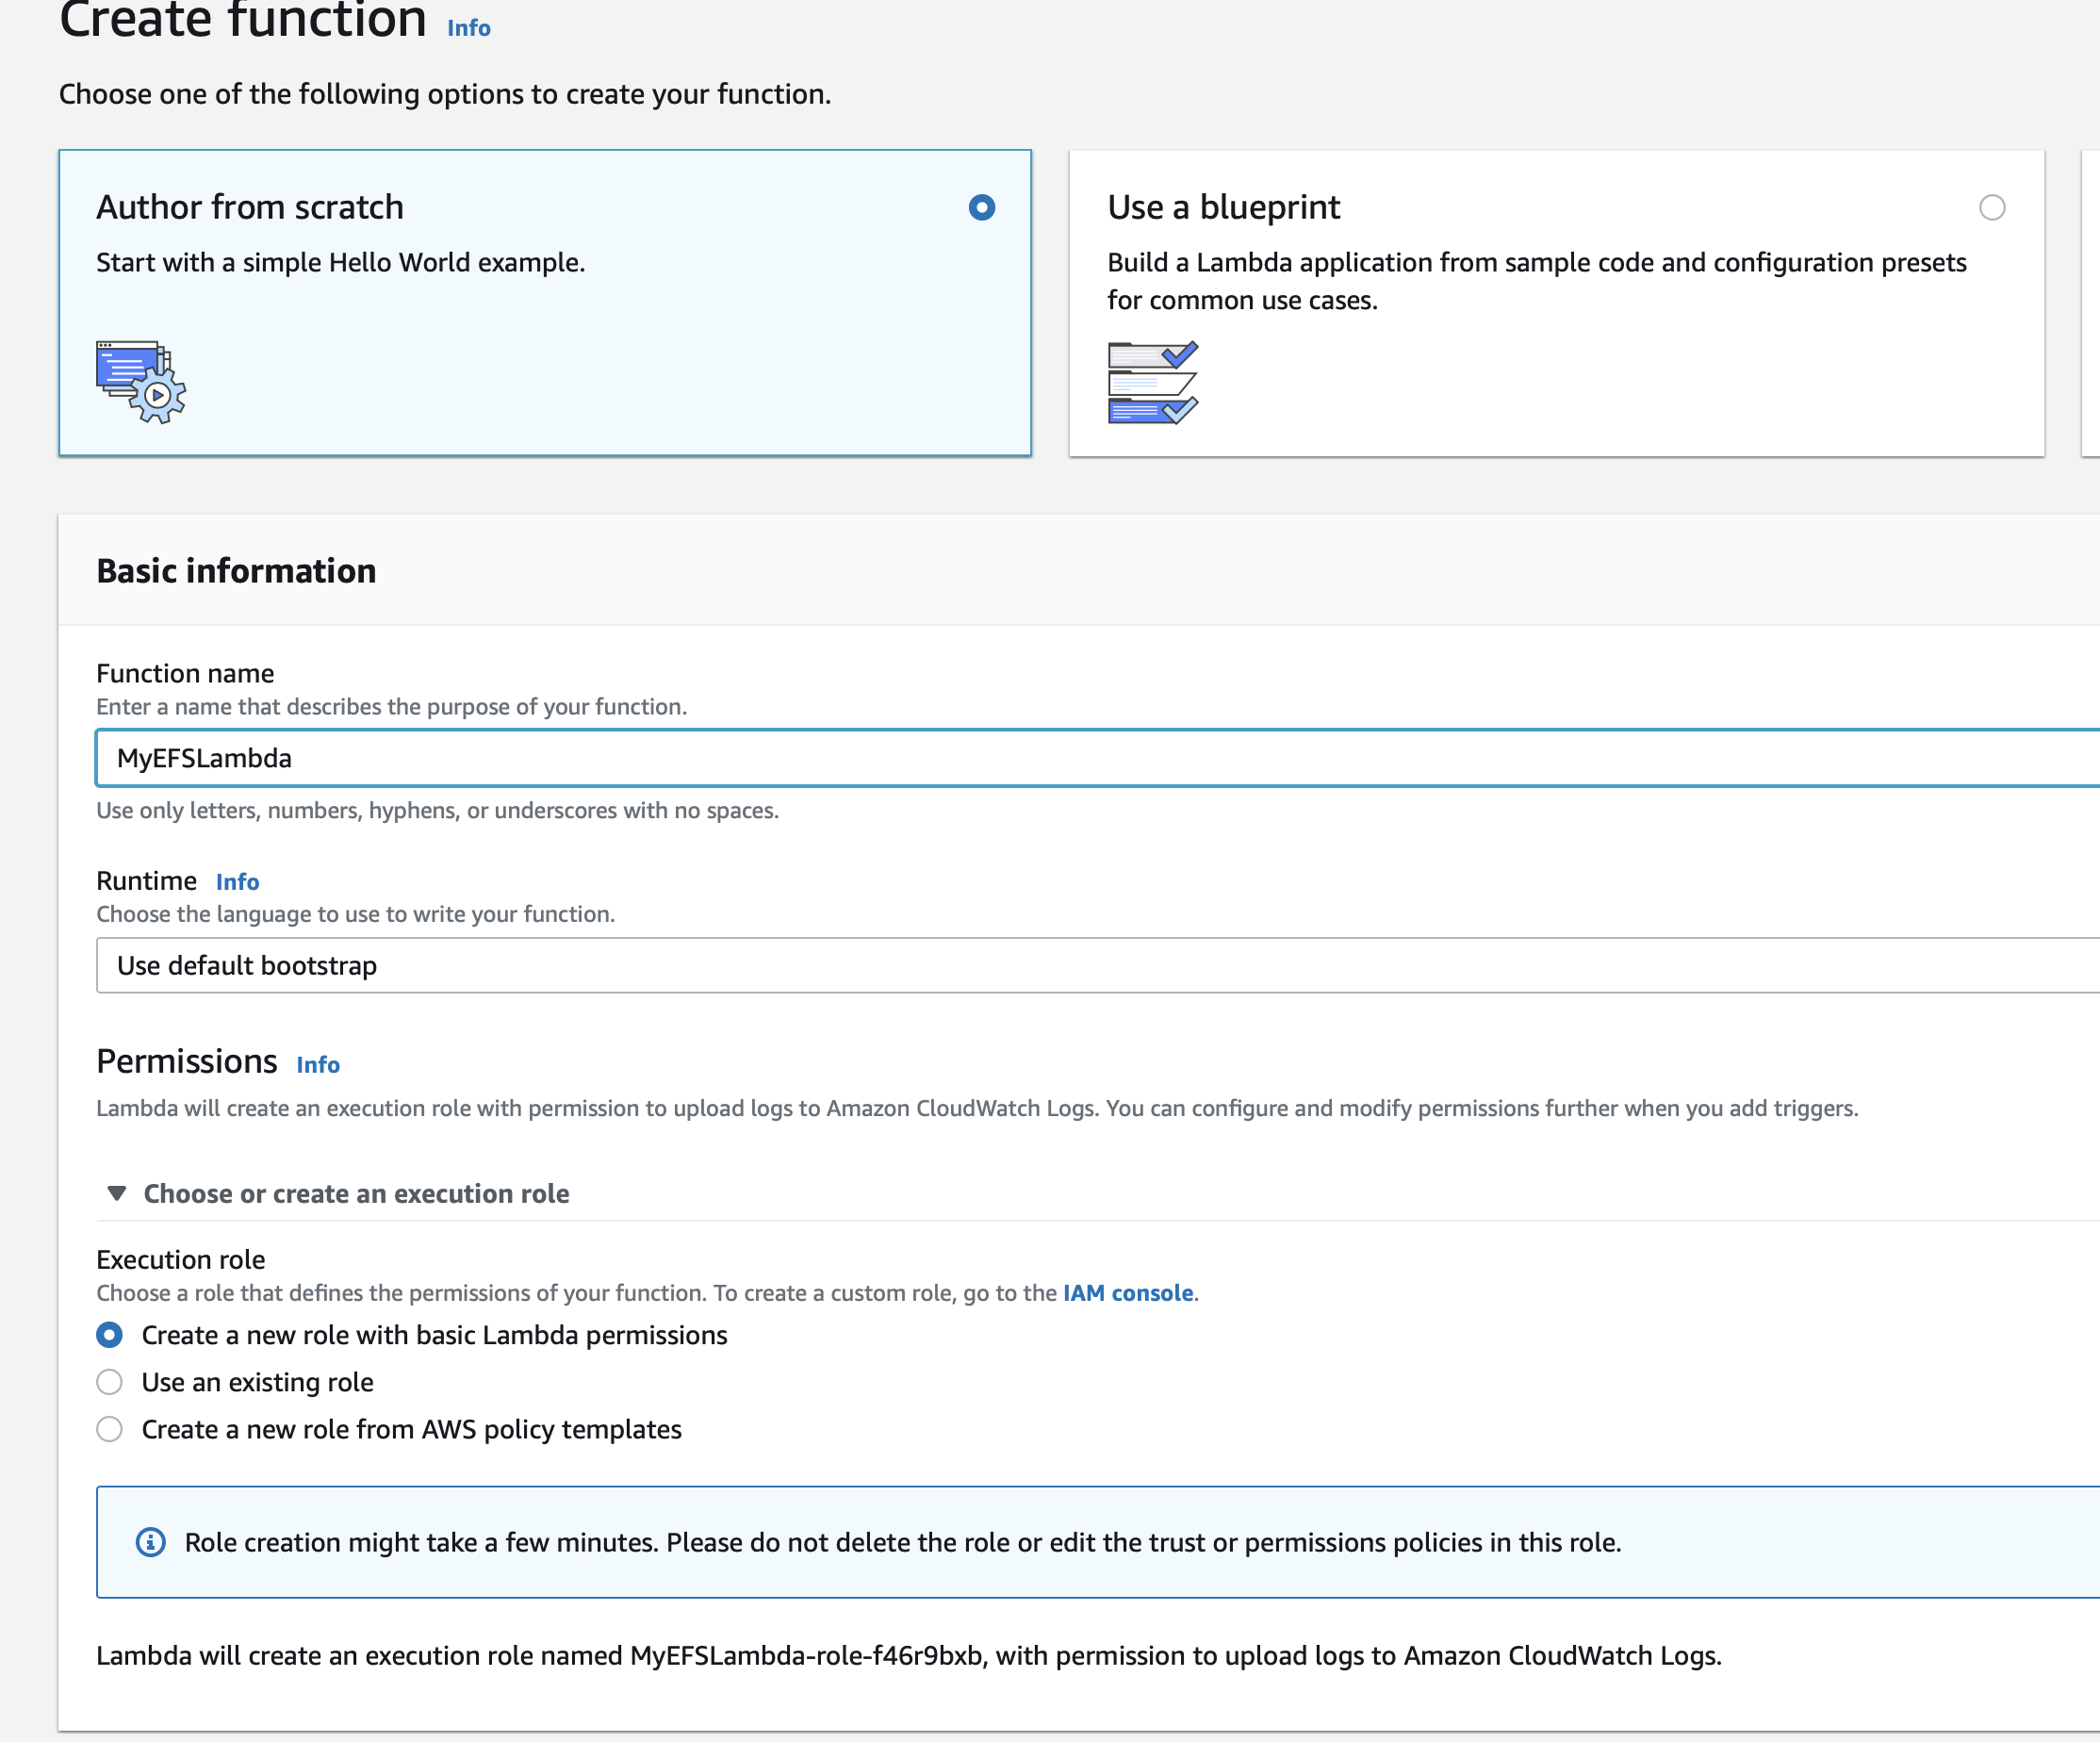
Click “Create Function”. Once the function is created, navigate back to IAM and edit the Role and add the policy we created earlier. Apply that change and we are now ready to test Lambda and EFS.
Within Lambda scroll down to “VPC” and click “Edit”. Select “Custom VPC” we will use the default VPC for this example so select that. Select the Subnets, as we selected the default VPC there will be only 1 subnet avaliable.
In Security group select “EC2-Security Group” which we created right at the beginning of this walk through. We don’t need any incoming access and can’t ssh to the Lambda for this example so we can reuse this security group.
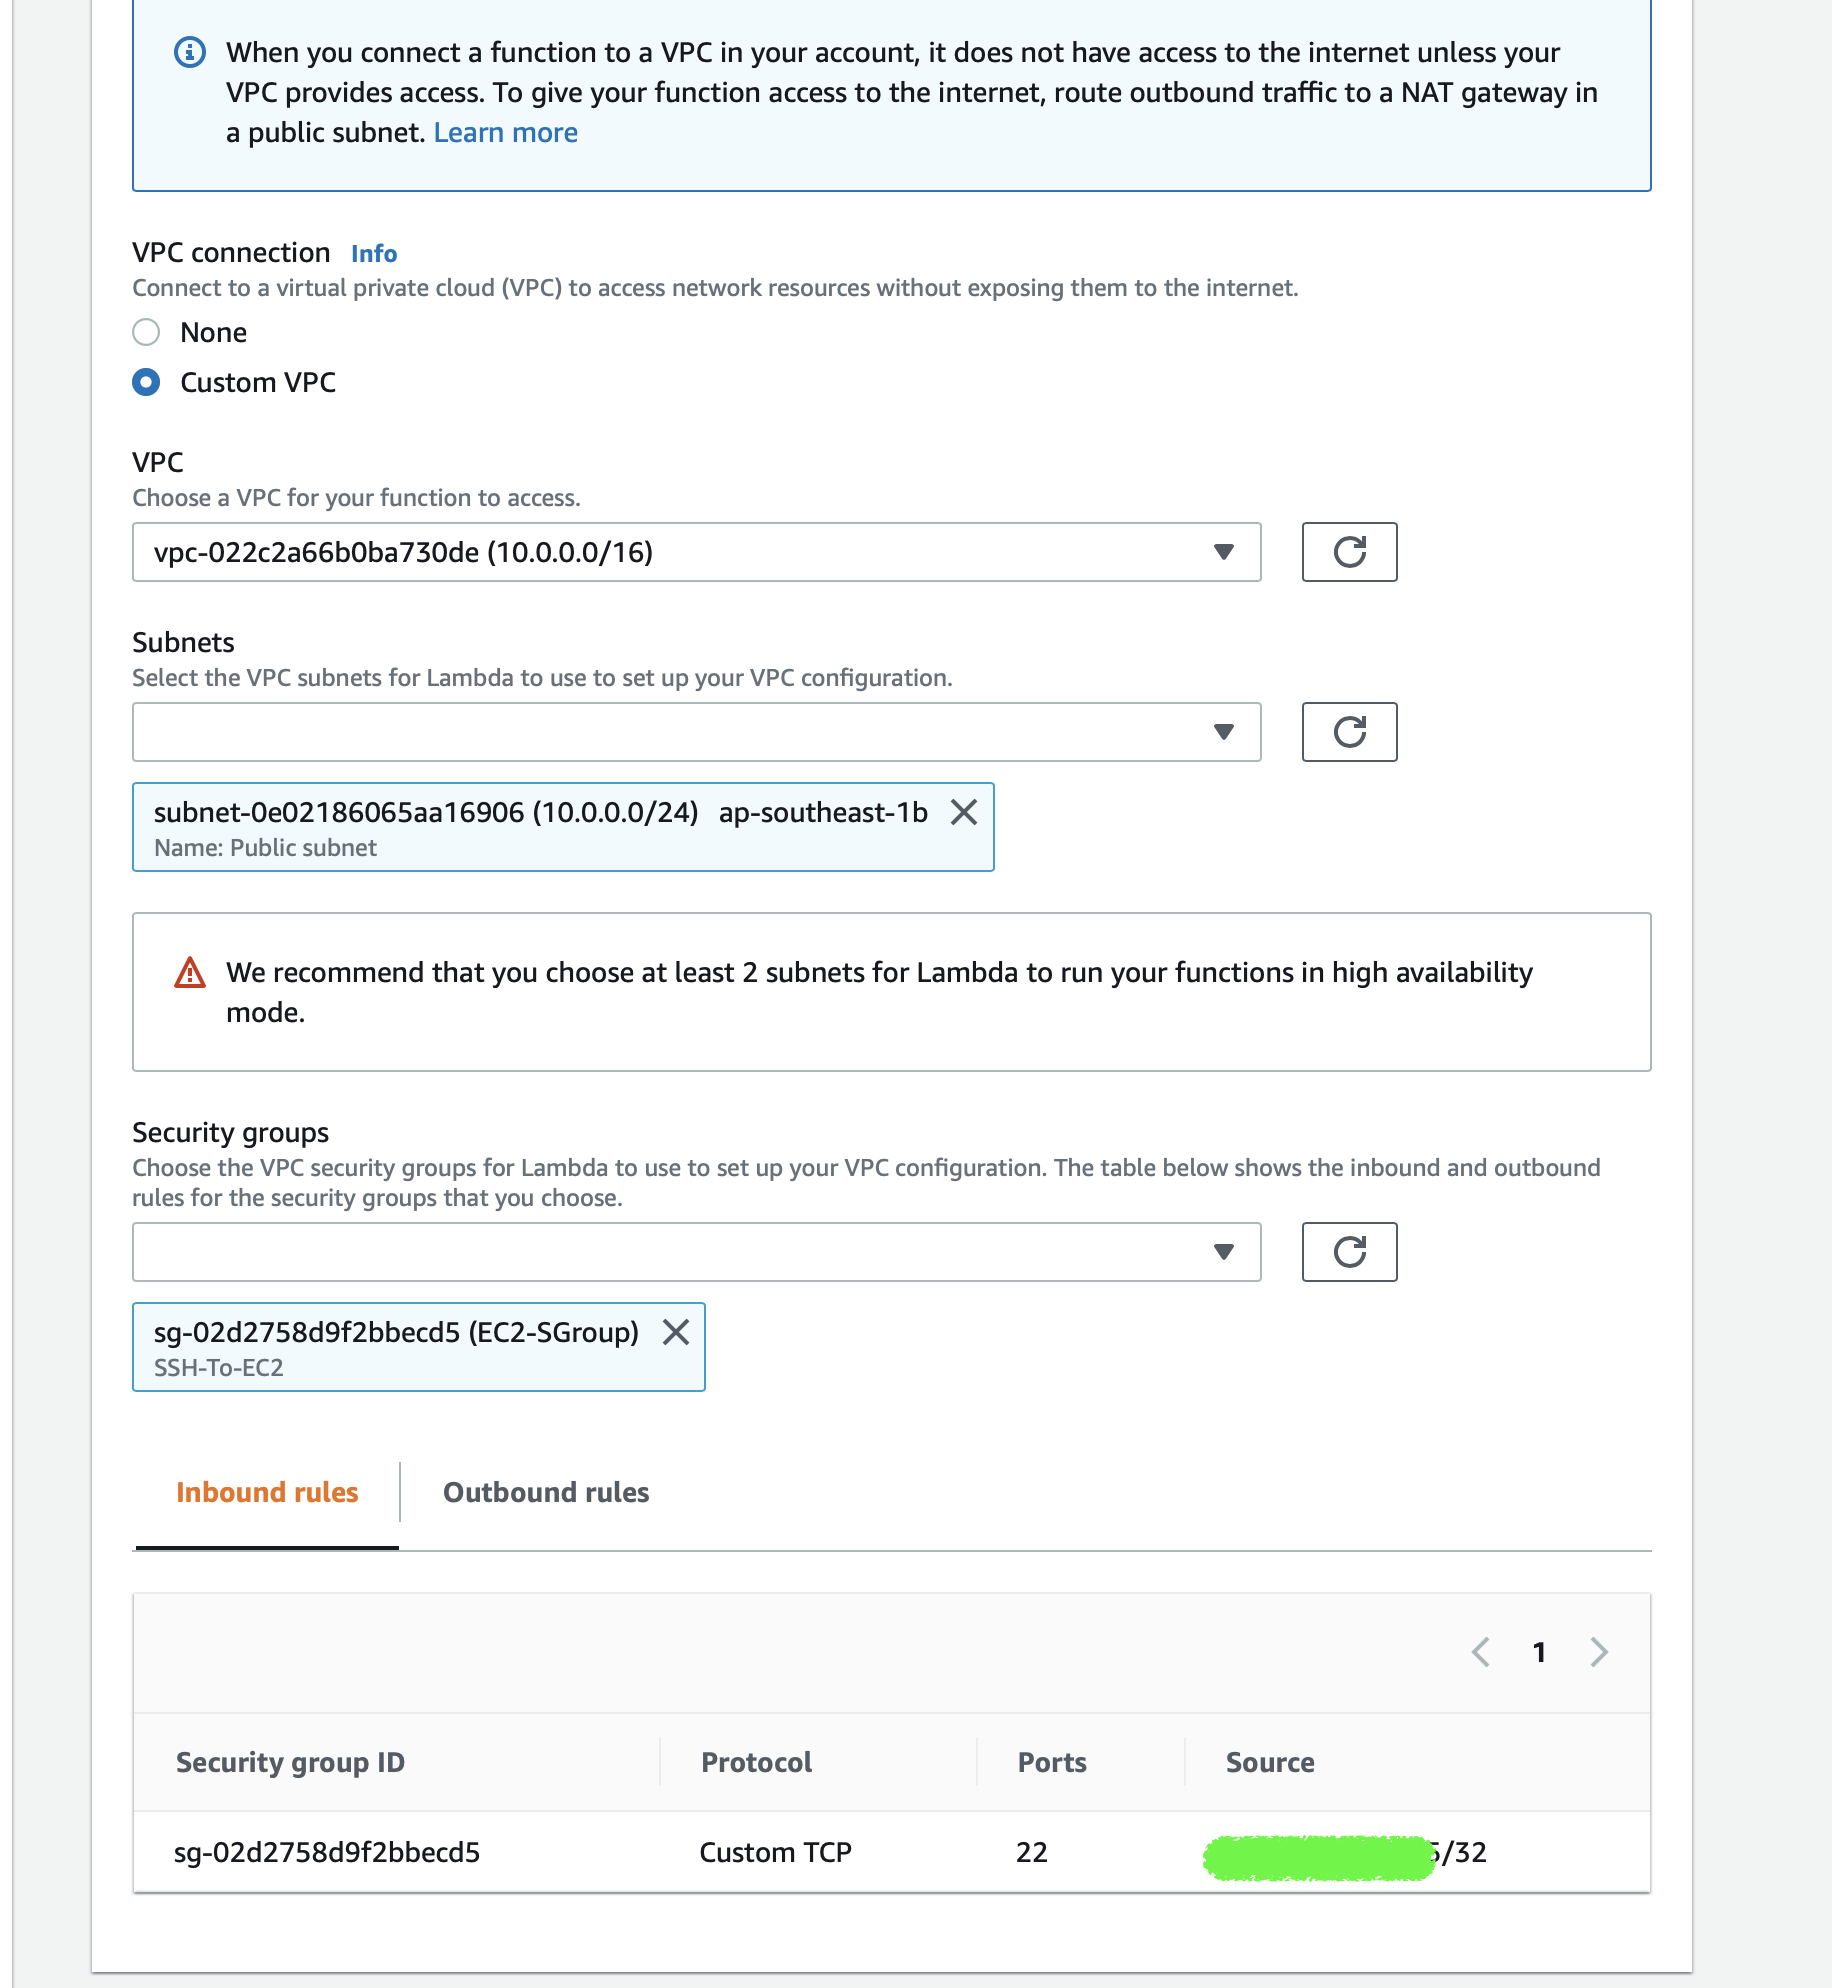
Then click “Save”, this may take a few seconds.
Next we will connect the EFS. On the main Lambda page scroll down and click “Add File System”.

For EFS Filesystem select the filesystem created, there should only be one.
For Access point select the one we created, again there should only be one.
For local path set this to:
/mnt/demoefs
The location must be under /mnt but can be anything you want to call it.
Click “Save” and we are now ready to test.
Scroll to “Function Code” and replace all the content of “hello.sh” with:
function handler () {
    EVENT_DATA=$1

    rm -rf /mnt/demoefs/500MegFile_lambda.bin
    dd if=/dev/zero of=/mnt/demoefs/500MegFile_lambda.bin bs=500M count=1 oflag=direct
    value=`ls -ls /mnt/demoefs`

    #value=`cat /mnt/demoefs/some_file.txt`

    RESPONSE="{\"statusCode\": 200, \"body\": \"$value\"}"
    echo $RESPONSE
}
Click, “Save” then test. This will take a few seconds to run, it will create a 500meg file on the EFS share and list the contents.
Once the Lambda is complete, look at the output as you can see it’s listing all the existing files that we created using EC2 as well as the new file:

Swap back to the terminal on the EC2 instance and run :
ls -la

Great, we can see files and write to EFS, the files are available to both lambda and EC2. Let’s quickly read the contents of “some_file.txt”
Remove all the code in hello.sh and replace with:
function handler () {
    EVENT_DATA=$1

    value=`cat /mnt/demoefs/some_file.txt`

    RESPONSE="{\"statusCode\": 200, \"body\": \"$value\"}"
    echo $RESPONSE
}
Click “Save” then “Test” and view the output!
 .
.
And there you have it, a quick overview of Lambda and EFS. Please let me know if you would like to see anything else as part of this example.